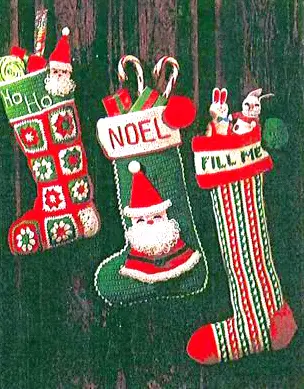
Delightful Christmas stockings to knit or crochet, fill with goodies and hang from the mantel: The one at left is the familiar granny square crochet pattern. The middle stocking is also crocheted, with a fat and fluffy Santa to boot. The striped one is knit in simple basic stitches. These holiday socks are easy to make—use remnants or small bits of yarn. Children’s names can be stitched on the cuffs.
CROCHET ABBREVIATIONS
beg—begin, beginning; bet—between; bl—block; cc—contrasting color; ch—chain; dc—double crochet; dec(s)—decrease(s); dp—double-pointed; dtr—double treble crochet; gr—gram; hdc—half double crochet; in(s) or “—inch(es); incl—including; inc—increase; k—knit; Ip(s)— loop(s); mc—main color; oz(s)—ounce(s); p—purl; pat(s)—pattern(s); pc—picot; psso—pass slip stitch over; rpt—repeat; re—remaining; rnd(s)—round(s); sc—single crochet; sk(s)—skein (s); sk—skip; sl—slip; sl st—slip stitch; sp(s)—space(s); st(s)—stitch (cs); st st—stockinette stitch; tog—together; tr—triple crochet; work even—work without inc or dec; yo—yarn over; yd(s)—yard(s); *—repeat whatever follows the * as many times as specified; ( )—do what is in parentheses the number of times indicated.
Granny Square Christmas Stocking
Stocking measures approximately 16″in length. Materials: Columbia-Minerva Nantuk SportsYarn (2 oz skeins): 1 skein each of #6019 Scarlet (S), #6095 Leaf Green (G), #6000 White (W), approximately 8 yards #6007 Pink (P); crochet hook, size E or any size hook that will obtain the stitch gauge below; scraps of red and dark brown felt; tapestry needle. Gauge: Working in single crochet—9 sc = 2″; 6 rows = 1″.
Note:Large square measures 3 1/4″ x 3 1/4″; medium square measures 2 3/4″ x 2 3/4″; small square measures 2 1/2″ x 2 1/2″.
FRONT: First Large Square: Starting at center with G, ch 4. Join with sl st to form ring. Rnd 1: ch 4, work (dc in ring, ch 1) 7 times. Join with sl st to 3rd ch of ch-4 (first 3 ch of ch-4 counts as 1 dc)—8 ch-1 sps. Cut yarn and fasten. (Note: To prevent loose ends, lay each end of yarn along top of Iast rnd made and crochet over it for 2 or 3 sts of following rnd, then cut end close to work.)Do not turn. Rnd 2: With S, make a loop on hook, yarn over hook (there are 2 loops on hook), insert hook in any ch-1spand draw up a loop, complete a dc, 2 more dc in same ch-1 sp, * ch 1, make 3 dc in next ch-1 sp; rpt from * around, end with ch 1. Join with sl st to top of first dc—8 3-dc groups.Note:At end of each rnd of each square, cut yarn and fasten. Rnd 3: With W, make a loop on hook, yarn over hook (2 loops on hook), draw up a loop in any ch-1 sp, complete a dc, 2 more dc insame sp, * sk 3 dc, in next ch-1 sp make 3 dc, ch 1 and 3 dc for corner; sk 3 dc, make 3 dc innext ch-1 sp; rpt from * 2 more times; sk 3 dc, in next ch-1 sp make 3 dc, ch 1 and 3 dc. Join with sl st to top of first dc—4 corner groups. Rnd 4: Attach G in any corner ch-1 sp on last rnd, ch 1, in same sp make 2 hdc, ch 1 and 2 hdc for corner; * hdc ineach of next 9 dc, in next ch-1 sp make 2 hdc, ch 1 and 2 hdc; rpt from * 2 more times; hdc in each of next 9 dc. Join with sl st to top of first hdc. Rnd 5: Attach S in any corner ch-1 sp, ch 1, in same sp make 2 sc, ch 1 and 2 sc; * sc in each of next 13 sts, in next ch-1 sp make 2 sc, ch 1 and 2 sc; rpt from * 2 more times; sc in each of next 13 sts. Join with sl st to first sc. Cut yarn and fasten. Mark this square #1.
Second Large Square: Working same as for First Large Square, work colors as follows: Rnd 1: W. Rnd 2: S. Rnd 3: G. Rnd 4: W. Rnd 5: S. Mark this square #2.
Third Large Square: Working as for First Large Square, work colors as follows: Rnd 1: S. Rnd 2: W. Rnd 3: G. Rnd 4: W. Rnd 5: S. Mark this square #3.
First Medium Square: Rnd 1: With S, work same as Rnd 1 of First Large Squre. Rnd 2: With G, work same as Rnd 2 of Large Square. Rnd 3: With W, same as Rnd 3 of Large Square. Rnd 4: Attach S in any corner ch-1 sp, ch 1, in same sp make 2 sc, ch 1 and 2 sc; * sc in each of next 9 dc, in next corner ch-1 sp make 2 sc, ch 1 and 2 sc; rpt from * 2 more times; sc in each of next 9 dc. Join to first sc. Mark #4.
Second Medium Square: Working first 3 rnds as First Large Square, work colors as follows: Rnd 1: G. Rnd 2: W. Rnd 3: G. Rnd 4: With S, work same as Rnd 4 of First Medium Square. Mark #5.
First Small Square: Starting at center with S, ch 4. Join with sl st to form ring. Rnd 1: Ch 3, into ring make (hdc, ch 1) 7 times. Join with sl st in 2nd ch of ch-3—8 ch-1 sps. Rnd 2: With W, work as Rnd 2 of First Large Square. Cut yarn and fasten. Rnd 3: With G, work as Rnd 3 of First Large Square. Rnd 4: With S, work as Rnd 4 of First Medium Square. Mark #6.
Second Small Square: Working same as First Small Square, work colors as follows: Rnd 1: W. Rnd 2: S. Rnd 3: W. Rnd 4: S. Mark this square #7.
Toe Square: Rnd 1: With G, work as Rnd 1 of Large Square. Rnd 2: With W, work as Rnd 2 of Large Square. Rnd 3: With S, work as Rnd 3 of Large Square. Rnd 4: Attach G in any corner ch-1 sp, ch 1, in same sp make 2 hdc, ch 1 and 2 hdc; hdc in each of next 9 dc, in next corner sp make 2 dc, ch 1 and 2 dc; (hdc in each of next 9 dc, 3 hdc in next ch-1 sp) 2 times (curved edge for toe); hdc in each of next 9 dc. Join to top of first hdc. Rnd 5: Attach S in first ch-1 sp at beg of last rnd, in same sp make 2 sc, ch 1 and 2 sc; sc in each of next 13 hdc, in next sp make 2 sc, ch 1 and 2 sc; sc in each rem st around. Join to first sc. Mark #8.
Heel Half Square: With W, ch 4. Join to form ring. Row 1: Ch 3, into ring make (hdc, ch 1) 3 times and hdc. Cut yarn and fasten at end of each row. Row 2: Do not turn, attach W with sl st in sp between ch-3 and first hdc at beg of last row, ch 3, 3 dc in same sp, ch 1, make 3 dc and ch 1 in each of next 3 ch-1 sps, dc in top of last hdc. Row 3: Attach W with sl st between ch-3 and first dc at beg of row, ch 3, dc in same place, sk next 3 dc, in next ch-1 sp make 3 dc, ch 1 and 3 dc; sk next 3 dc, make 3 dc in next ch-1 sp, sk 3 dc, in next sp make 3 dc, ch 1 and 3 dc; sk next 3 dc, 2 dc in next ch-1 sp. Row 4: Attach W in top of ch-3 at beg of row, ch 1, hdc in same st, hdc in each of next 4 sts, 2 hdc in next ch-1 sp (curved corner of heel), hdc in each of next 9 sts, in next sp make 2 hdc, ch 1 and 2 hdc; hdc in each rem st. Row 5: Attach S in top of first hdc, sc in same st, sc in each st to ch-1 sp, in ch-1 sp make 2 sc, ch 1 and 2 sc (upper corner); sc in each st to within Iast st, in last st work 2 sc, ch 1 and 2 sc for corner; work 13 sc evenly spaced along straight edge of half square. Join with sl st to first sc. Mark #9.
Instep Corner: With S, ch 14; sl st in 2nd ch from hook, sc in next ch, hdc in next ch, dc in each of next 3 sts, in next ch make 2 dc, ch 1 and 2 dc; dc in each of next 3 ch, hdc in next ch, sc in next ch, sl st in last ch. Cut yarn and fasten. Mark #10.
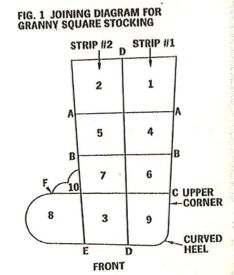
Joining: Arrange squares into 2 strips (see Fig. 1) for front of stocking. With a darning needle and S, working through back lp only of each sc throughout, sew squares of first strip together, matching corners and easing in longer edge of larger square to fit adjacent smaller square by occasionally working twice through same st on smaller square (A, B and C on Fig. 1 indicate seams). Join squares of second strip together in same manner. Being very careful to match seams, sew strips together (D in Fig. 1). Sew #8 square to #3 square (E seam), with curved edge at toe end, as shown. Sew instep corner in place.
BACK: Work same as Front, but reversing position of heel, toe and instep pieces.
To Assemble: Hold back and front with wrong sides together, matching edges; baste pieces together, leaving top edge open. Using S and crochet hook, with front section facing, attach yarn in upper left side corner; working through both thicknesses along side edge, insert hook in back lp only of next sc on front and in corresponding lp on back and work a sl st, continuing to work in back lp of each st, * sl st loosely in next st through both sections; rpt from * along basted edges, ending at top right side corner. Cut yarn and fasten.
Top Band: Rnd 1: With right side facing, attach W to top end of right side seam, working in back loop only of each st, sc in each st along entire top edge. Join with sl st to first sc. Rnd 2: Sl st loosely in each sc around. Join. Cut W and fasten; attach G in same st as joining. Rnd 3: With G, working in back of sl sts, sc in top of each sc of Rnd 1. Join with sl st to first sc. Ch 1, turn. Rnd 4: Sc in each sc around. Join with sl st to first sc. Ch 1, turn. Rpt last rnd 15 more times. Cut G and fasten; attach W to joining. Next Rnd: With W, right side facing, sc in each sc around. Join. Next Rnd: Do not turn; sl st loosely in each sc around. Cut W and fasten.
Santa’s Face: With P, ch 9. Row 1 (right side): Sc in 2nd ch from hook, sc in each ch across—8 sc. Ch 1, turn. Row 2: Sc in each sc across. Ch 1, turn. Row 3: Working in back lp only of each sc, 2 sc in first sc, sc in each sc to end sc, 2 sc in last sc. Ch 1, turn. Row 4: Working through both lps, sc in each sc across. Ch 1, turn. Row 5: 2 sc in first sc, sc in each sc to last sc, 2 sc in last sc—12 sc. Ch 1. turn. Row 6: Rpt Row 4. Ch 1, turn. Row 7: Sk first sc, sc in each sc to within last 2 sc,sk next sc, sc in last sc—dec made at each end. Ch 1, turn. Rows 8 and 9: Rpt Rows 4 and 7—8 sc. Ch 1, turn. Row 10: Rpt Row 4. Cut yarn and fasten; attach S and ch 1, turn.
Cap: Row 1: With S, 2 sc in first sc, scin each sc to last sc, 2 sc in last sc. Ch 1, turn. Rows 2 and 3: Rpt last row—12 sc. Ch 1, turn. Rpt Rows 4 and 7 of Face alternately until 2 sc rem. Ch 1, turn. Sl st between 2 sc of last row, ch 20, carry chain down wrong side of cap and sl st in back lp of each of 2 center sc of Row 1 of Cap—lp for hanging stocking made. Cut yarn and fasten.
Beard: Turn head upside down; with right side facing, fold back first 2 rows of face. Cut a piece of cardboard 3/4″wide and about 2″long. Row 1: Using crochet hook, attach W in free lp on first sc on 2nd row on face. Hold cardboard in back of work, wind yarn from back to front around the 3/4″ width of cardboard, insert hook in same lp where yarn was attached, yarn over hook, draw lp through st on hook, yarn over hook, draw through the 2 lps on hook—lp st made. Work a loop st in each free lp across Row 2 of face. Ch 1, turn. Row 2: SI st loosely in each sc across. Ch 1, turn. Row 3: Two loop sts in first sl st, loop st in each st to within last st, 2 loop sts in last st. Ch 1, turn. Rows 4 and 5: Rpt last 2 rows—12 loop sts. Ch 1, turn. Row 6: Sk first st, sl st in each st to within last 2 sts, sk next st, sl st in last st. Ch 1, turn. Row 7: Loop st in each st across. Ch 1, turn. Rpt last 2 rows until
2 loop sts remain. Cut yarn and fasten.
Cap Band: With W, ch 14. Cut a piece of cardboard 1/2″ wide and about 2″ long. Row 1: Loop st in 2nd ch from hook, loop st in each ch across. Ch 1, turn. Row 2: SI st in each st across. Ch 1, turn. Row 3: Loop st in each sl st across. Cut yarn and fasten. Sew band across Row 2 of cap.
Pom-pom: Wind W 20 times around a 1/2″piece of cardboard. Tie at one end; cut at opposite end. Trim evenly. Tack pom-pom to tip to cap.
Face: From brown felt, cut two small crescents1/2″long for eyes; from red felt, cut a 3/8″circle for nose. Sew or paste eyes and nose on face, as shown.
Finishing: Sew Santa’s head to upper right side corner of top band as shown.
Ho Ho: With W make chains to form letters as follows: For each H: Crochet 2 chains of 8 ch sts each and 1 of 4 ch sts. For each O: One chain of 16 ch sts. Cut yarn and fasten at end of each chain. Using photo as a guide,arrange chains to form “Ho Ho” on left side portion of top band. With W, sew chains in place.
Santa Claus Crocheted Christmas Stocking
Stocking measures approximately 17 1/2″in length. Materials: Columbia-Minerva Nantuk Sweater &Afghan Yarn (2 oz skeins): 2 skeins of #6393 Clover (C), 1 skein #6313 Scarlet (S), 1 skein #6300 White (W), approximately 10 yds. of #6329 Baby Pink (P); and Columbia-Minerva Amy (1 oz skeins): 1 skein of #2701 White (WA); scraps of black and red felt; crochet hook, sizes E and G, or any size hook that will obtain the following stitch gauge. Gauge: With G hook—4 sts = 1″; 9 rows = 2″.
FRONT: Starting at lower edge with color C and size G hook, ch 34. Row 1: Sc in 2nd ch from hook, sc in each ch to last ch, 2 sc in last ch—inc made. Ch 1, turn. Row 2: Sc in each sc to last sc, 2 sc in last sc—35 sc. Ch 1, turn. Rows 3 through 7: Rpt Row 2—40 sc. Ch 1, turn. Row 8: Sc in each sc. Row 9: Rpt Row 2. Ch 1, turn—41 sc. Rows 10 through 13: Rpt Row 8. Ch 1, turn. Row 14: Sk first sc—dec made at toe edge; sc in each sc across. Ch 1, turn. Row 15: Sc in each sc. Rows 16 through 19: Rpt last 2 rows (Rows 14 and 15) 2 times—38 sc. Ch 1, turn. Row 20: Rpt Row 14. Ch 1, turn. Row 21: Sc in each sc to within last 4 sc, sk next sc, sc in next sc; do not work over rem 2 sts. Ch 1, turn. Row 22: Sk first sc, sc in each rem sc—33sc. Rows 23 and 24: Rpt Rows 21 and 22—20 sc. Ch 1, turn. Rows 25 through 29: Rpt Row 15 once, then Rows 14 and 15 alternately 2 times—27 sc. Ch 1, turn. Rows 30 through 79: Rpt Row 15 only (even row) 50 times, ending at toe side. At end of row, cut C; attach W and with W ch 1, turn. Stocking should measure about 17″ from beg.
Cuff: Row 1: With W, working in back lp only of each sc, work 2sc in first sc, sc in each sc to last sc, 2 sc in last sc—29 sc. Mark Row 1 for right side. Ch 1, turn. Rows 2 and 3: Working through both lps of each sc, work same as last row—33 sc. Ch 1, turn. Next 15 Rows: Sc in each sc across. At end of last row, cut yarn and fasten.
Edging: Row 1: With right side of Row 1 of cuff facing, attach W to side of end sc of Row 1, working along ends of rows, sc over end st of each row across to next corner, 3 sc in corner st, sc in each sc across last row to next corner, 3 sc in corner st, sc over end of each row along next side edge. Cut yarn and fasten. Do not turn. Row 2: Attach S to back lp of first sc on last row made, sl st loosely in back lp of each sc across last row. Cut yarn and fasten.
BACK: Work same as Front until Row 79 has been completed. Cut yarn and fasten (do not work cuff).
Santa Appliqué—Body: Starting at neck edge with S and G hook, ch 17. Row 1: Sc in 2nd ch from hook, sc in each ch across—16 sc. Ch 1, turn. Row 2: 2 sc in first sc, sc in each sc to last sc, 2 sc in last sc—inc made at each end. Ch 1, turn. Row 3: Scin each sc across. Ch 1, turn. Row 4: Rpt Row 3. Ch 1, turn. Rows 5, 6 and 7: Rpt Rows 2, 3 and 4—20 sc. Rows 8 through 17: Rpt Rows 2 and 3 alternately 5 times—30 sc. Ch 1, turn. Row 18: Sk first st, sc in each sc to within last 5 sc, sl st in next sc. Rpt last row 4 more times—5 sts. At end of last row do not turn, sc in each of next 14 sts. Ch 1, turn. Last Row: 2 sc in first sc, sc in each of 28 sts, 2 sc in turning ch-1. Cut yarn and fasten.
Face: Working along starting chain of body, attach P to firsc ch st. Row 1 (right side): Sc in same ch, sc in each of next 15 ch—16 sc. Ch 1, turn. Row 2: Sc in each sc across. Ch 1, turn. Row 3: Working in back lp only of each sc,sc in each sc across (front lps of sts are left free for working beard later). Ch 1, turn. Next 6 Rows: Working through both lps of sts, sc in each sc across. Ch 1, turn. At end of last row, cut yarn and fasten. Turn.
Cap: Attach S to first sc on last row. Row 1: Sc in same sc, sc in each sc across—16 sc. Ch 1, turn. Rows 2 and 3: Rpt Row 2 of Body 2 times—20 sc. Ch 1, turn. Row 4: Sc in each sc across. Ch 1, turn. Row 5: Sk first sc, sc in eachscto within last 2 sc, sk next sc, sc in last sc. Ch 1, turn. Rpt last 2 rows alternately until 2 sc rem. Cut yarn and fasten.
Beard: Cut a piece of cardboard 3/4″wide and about 2″long. Row 1: Turn Santa upside down, with right side facing, fold piece at 2nd row of face; holding folded piece with cap side toward you, using size E hook, attach WA in free lp of first sc on 2nd row of face; hold cardboard in back of work close to Row 2 of face, wind yarn from back to front around the 3/4″ width of cardboard, insert hook in same lp where yarn was attached, yarn over hook, draw lp through st on hook, yarn over hook, draw through the 2 lps on hook—loop st made; make another loop st in same st, working in free loops across same row, work loop st in each st to last st, 2 loop sts in last st. Ch 1, turn. Row 2: SI st loosely in each st across. Ch 1, turn. Row 3: 2 loop sts in first sl st, loop in in each sl st to last st, 2 loops sts in last st. Ch1 turn. Row 4: Rpt Row 2. Ch1, turn. Row 5: Loop st in each sl st across. Ch 1, turn. Rows 6 and 7: Rpt Rows 2 and 5. Ch1, turn. Row 8: Sk first st, sl st loosely in each st to within last 2 sts, sk next st, sl st in last st. Ch 1 turn. Row 9: Loop st in each sl st across. Rpt last 2 rows until there are 8 loop sts. Cut yarn and fasten.
Hat Band: With WA and E hook, ch 23. Cut a piece of cardboard 3/8″ wide. Row 1: Work lp st (same as for beard) in 2nd ch from hook and in each ch across. Ch 1, turn. Rpt Rows 2 and 5 of beard. Cut yarn and fasten Sew band to 3rd row of cap.
Bottom Edging: With WA, ch 42. Work same as Hat Band. Sew edging to lower edge of body, adjusting to fit.
Finishing: From black felt, cut two crescents 1″ long for eyes; from red felt, cut 1/2″ circle for nose. Sew or paste eyes and nose on face as shown in photo. From black felt, cut a 3/8″ x 6 1/2″ strip for belt. Buckle: With C and size E hook, ch 10. Join with sl st to form ring, ch 6, sl st in 4th ch of ring (forming double circle). Ch1, sc in next ch, 2 sc in next ch for corner, sc in each of next 2 ch, 2 sc in next ch, sc in next ch; sc in each of 4 ch sts between circles; working along next circle, make sc in next ch, 2 sc in next sc, sc in each of 2 ch, 2 sc in next ch, sc in last ch. Join with sl st in first sc. Cut yarn and fasten. Draw felt belt through buckle. Place belt over body as shown and sew ends of belt to wrong side. For Boots, cut two 1 1/2″ x 2 1/4″ oblongs from black felt; taper side edges, making top edge of each piece 1 1/4″ across. Paste or sew the two pieces together, back to back; sew or paste boots under edging at center of lower edge of body. Place Santa appliqué over front section of stocking and stitch inplace.
Noel: With S and G hook, make chains to form letters as follows: For N: Crochet 2 chains of 10 ch sts each and 1 of 8 ch sts. Cut yarn and fasten at end of each chain. For O: One chain of 22 ch sts. For E: One of 10 ch sts, 2 of 4 ch sts and 1 of 3 ch sts. For L: One of 14 ch sts. Fold cuff of front of stocking to right side. Using photo as a guide, arrange chains to form “Noel” at center of cuff. With S, sew chains in place. Tack lower edge of cuff in place. Baste back and front sections of stocking together, matching rows.
Joining: Using W and G hook, with front facing, attach yarn with sl st at end of front edge seam (excluding cuff); working through both thicknesses, along ends of rows, sl st in end st of last C row of front and back, * ch 3, sl st in 3rd ch from hook for picot, sk next row on both pieces, sl st in end st of next row of both pieces; rpt from * along end of rows to lower edge; working along opposite side of starting chains, ch 3, complete picot, sk next ch, sl st in next st of both pieces; continue in this manner to work joining across lower edge, then work as before over end of rows across to top edges. Cut yarn and fasten.
Loop for Hanging and Pom-pom: With S, work same as for Knitted Christmas Stocking. Tack end of loop and pom-pom to top end of back seam. With WA make a 1″ pom-pom and tack to tip of cap.
Knitted Christmas Stocking
Stocking measures approximately 19 1/2″ in length. Materials: Columbia-Minerva 4-ply Nantuk knitting yarn (4 oz skeins): 1 skein each of #5914 Scarlet (S), #5944 Christmas Green (G), #5907 White (W)—1 1/2oz of each color will make 1 stocking; knitting needles, 1 pair no. 6, or any size needles that will obtain the following stitch gauge; crochet hook, size G; tapestry needle. Gauge: 5 sts = 1″; 6 rows = 1″.
Toe and instep: Starting at toe with S, cast on 6 sts. Row 1 (right side): K 6. Row 2: P across. Row 3: K1, insert needle under bar before next st and k one st—onest inc made; (k 2, inc one st as before) twice; k last st—9 sts. Row 4 and all even-numbered Rows: P across. Row 5: (K 2, inc one st as before) 4 times; k 1—13 sts. Row 7: K 1, (inc one st as before, k 3) 4 times—17 sts. Row 9: (K 4, inc one st) 4 times; k 1—21 sts. Row 11: K across. Row 12: P across. Rows 13 through 28: Rpt Rows 11 and 12 alternately 8 times. Cut S, leaving a 3″ length; attach W. Slip Stitch Pattern—Row 29: With W, k across row. Row 30: P across. Row 31: Attach G, drop W (do not cut W). With G, k across. Row 32: P across. Row 33: Pick up W and twist around G once, drop G; with W * holding yarn in back, sl 1 as if to p, k 2; rpt from * across. Row 34: With W, k across. Note: When changing color, always twist color not in use around other strand once. Row 35: Change color to G, drop W, with G * k 2, sl 1 as before; rpt from * across to last 3 sts, k 3. Row 36: With G, p across. Cut G (do not cut W). Rows 37 through 44: Using S instead of G, work same as for last 8 rows (Rows 29 through 36). Cut S. Last rows (Rows 29 through 44) form pat.
Leg: Pick up W and on same needle (with sts), cast on 60 sts—81 sts. Rows 45 through 52: Working across all sts, with G and W, rpt Rows 29 through 36. Rows 53 through 60: Using S instead of G, rpt Rows 29 through 36. Rows 61 through 68: Using G, rpt same 8 rows of pat. Measure about 25 yards of S and wind into a separate small ball (call this ball 2nd S strand).
Heel Shaping: Row 69: With W, k 66;drop W to wrong side of work, attach 2nd S strand and with this S strand k rem 15 sts. When changing color, continue to twist strand not in use around the other once to prevent making holes in work. Row 70: With 2nd S strand p 16, change to W dropped below and with W prem sts. Attach first S strand. Row 71: With S, k 64; drop S, pick up 2nd S strand and k rem 17 sts. Row 72: With 2nd S strand p 18, drop 2nd S strand, pick up first S strand dropped below and p rem sts. Row 73: With W, (sl 1, k 2) 20 times; sl 1, k 1, drop W, pick up 2nd S strand and k 19. Row 74: With 2nd strand p 20, with W k rem sts. Row 75: With first S (k 2, sl 1) 20 times, drop S, pick up 2nd S strand and k 21. Row 76: With 2nd S strand p 21, with first S strand dropped below p rem 60 sts. Cut first S strand. Rows 77 through 100: Working the 21 sts of heel with 2nd S strand even in st st (k I row, p 1 row), work remaining 60 sts in pat (starting with Row 29) for 24 rows. Rows 101 through 104: With S, work 4 more rows of pat over 60 sts, keeping heel sts even. Row 105: With W (sl 1, k 2) 20 times; k 1, with 2nd S strand k 20. Row 106: With 2nd S, p 19. With W, k across. Row 107: With first S (k 2, sl 1) 21 times; with 2nd S k 18. Row 108: With 2nd S p 17, with first S p 64. Cut first S. Row 109: With W k 65, with 2nd S k 16. Row 110: With 2nd S p 15, with W p 66. This completes heel; cut 2nd S strand. Working in pat across all sts, rpt Rows 31 through 44; then rpt Rows 29 through 36 once more. Cut G. Next Row: With W k across. Next Row: P 21, bind off rem sts for front edge of leg—leg completed.
Instep and Toe: Rows 1 through 16: With S, rpt Rows 31 through 36; then with G, rpt Rows 29 through 36; with W rpt Rows 29 and 30. Cut W; attach S. Rows 17 through 26: With S only, work in st st (k 1 row, p 1 row). Row 27: (K 3, k 2 tog) 4 times: k 1—4 decs made. Row 28: P across. Row 29: Continuing in st st, dec 4 sts evenly spaced across. Rpt last 2 rows (Rows 28 and 29) 1 more time—9 sts. Next Row: (K 2 tog) 4 times; k 1. Bind off.
Top Band: With S, cast on 66 sts. Rows 1 through 10: Work in garter st (k each row). Cut S; attach W. Rows 11 trhough 24: With W, work 14 rows in st st (k 1 row, p 1 row). Change to S. Rows 25 through 34: With S, work 10 rows in garter st. Bind off. Fold piece at center lengthwise, mark fold.
Embroidery: Following chart (seeFig. 2), with G and tapestry needle, embroider letters in Duplicate Stitch (see Fig. 3) at center of first halt of band.
Finishing: Lightly steam heel and toe of stocking only with a warm iron. With right sides together, fold stocking at center back, matching toe and front edges of leg. Baste front edge, instep, toe and sole edges together. Using a darning needle and matching colors, working 1/8″ infrom outer edge, sew all seams: round off back of heel by sewing in Back Stitch (see stitch diagrams below)in a semicircle shape as shown. Turn stocking right side out. Sew ends of top band together. Place and pin band as pictured over top edge of stocking, with lower garter stitch section overlapping top edge of stocking and having each end of band extending 1″ beyond stocking. From wrong side, sew top edge of stocking to beg of st st section of band.
Loop for Hanging: With crochet hook and 2 strands of S held together, ch 20. Cut yarn and fasten. Tack ends of chain inside back top corner of band.
Pom-pom: Cut 2 cardboard circles, each 2 1/2” in diameter. Cut a hole 1 1/2″in diameter at center of each circle. Cut 4 strands of G yarn, each 8 yds long. Place circles tog and wind yarn around the double circle, drawing yarn through center opening and over edge until hole is filled. Cut yarn around outer edge between circles. Slip a double strand of yarn between cardboard circles; tie securely around strands of pom-pom. Remove cardboard, trim evenly. Tack to back top corner of band.