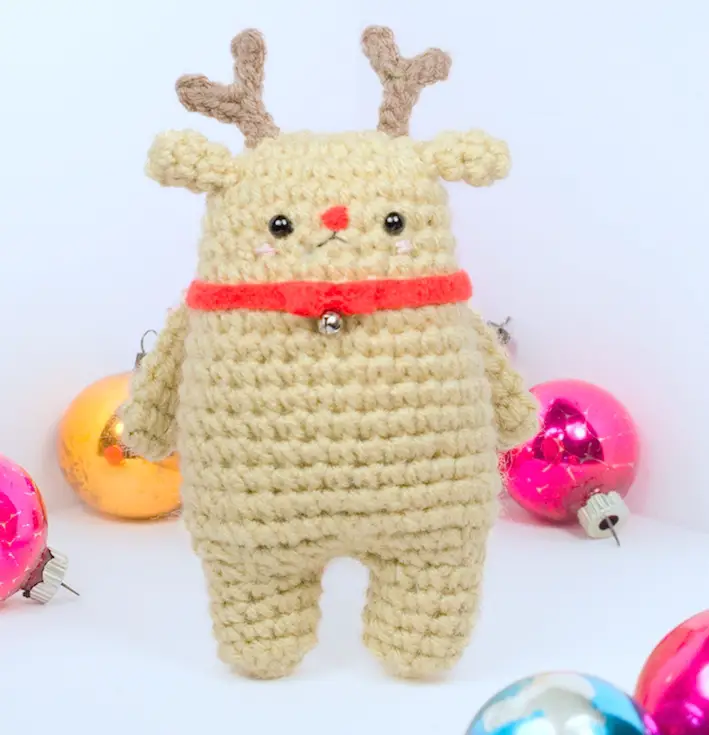
Finished Size
6.5 inches (16.51 cm) x 4.5 inches (11.43 cm)
Materials
- 3.25 mm crochet hook (This is my favorite hook.)
- Red Heart Super Saver yarn in Mushroom
- Red Heart Super Saver yarn in Buff
- Bright red felt
- polyester filling (I use this filling.)
- tapestry needle
- Sewing needle
- black and red thread
- 6mm safety eyes (I just bought this set of 150 safety eyes in various sizes for $7.99!)
- 6mm jingle bell
Skills Needed
- amigurumi finish
- crochet in an oval
- invisible decrease
- magic circle crochet
- sewing felt onto amigurumi
Gauge
No gauge swatch is necessary for this project. You can make the reindeer smaller or larger by increasing or decreasing the yarn weight or hook size.
Abbreviations (U.S. terms)
ch – chain
inc – increase
dec – invisible decrease
mc – magic circle
sc – single crochet
sl st – slip stitch
Pattern notes
- The body is worked in an oval.
- The legs, arms and ears are worked in a circle.
- The antlers are worked flat.
- You will be joining rounds instead of working continuously. Chain 1 at the beginning of each row. Slip stitch to the first stitch of the row at the end of each row.
- The legs are worked with a more advanced crochet technique. Photos are provided to guide you along if you get stuck.
- I added safety eyes after stuffing. If you’d like to add them before stuffing place them 2 stitches over from the ears with 4 stitches between each eye. They are attached between rows 5 and 6.
Pattern Instructions
Face and Body (make with buff)
Row 1: ch 6, skip first ch, inc, 3 sc, 3 sc in next st, 3 sc, sc in the first sc of the round. (12)
Row 2: *inc, sc* 6 times (18)
Row 3: *inc, 2 sc* 6 times (24)
Rows 4-8: sc around (24)
Row 9: *inc, 3 sc* 6 times (30)
Row `10-15: sc around (30)
Row 16: *inc, 4 sc* 6 times (36)
Row 17: sc around (36)
Row 18: *dec, 4 sc* 6 times (30)
Row 19: *dec, 3 sc* 6 times (24)
Finish off. Cut Yarn.
Legs (repeat twice with buff)
*Scroll down for more detailed instructions on the legs*
Reattach yarn at the 14th stitch from the join.
Row 1-5: Sc in next 10 stitches (10)
Row 6: dec 5 times (5)
Cut yarn. Stitch leg closed.
Fill body and leg with stuffing.
Reattach yarn two stitches over.
Row 1-5: Sc in next 10 stitches (10)
stuff
Row 6: dec 5 times (5)
Cut yarn. Stitch leg closed.
Stitch the 4 stitches between each leg together.
- The yarn has been cut after row 19. Flatten your work.
- Insert your hook into the 14th stitch from the join.
- Single crochet in the next 10 stitches. Follow the leg pattern. Stuff the body and leg firmly. Count 2 stitches over. Repeat the leg pattern again.
- Stuff the second leg. There should be 2 open stitches on both sides of your work (4 stitches total). Weave your yarn through these stitches to close them up.
Arms (make 2 with buff)
Row 1: 6 sc in mc (6)
Rows 2-7: sc around (6)
Finish off. Leave a long tail.
Ears (make 2 with buff)
Row 1: 5 sc in mc (5)
Rows 2-3: sc around (5)
Finish off. Leave a long tail.
Antlers (make 2 with mushroom)
Row 1: ch 8, skip first ch, 3 sl st, ch 4, turn, skip first ch, 3 sl st, 4 sl st
Finish off. Leave a long tail.
Felt
From a scrap of bright red felt cut:
Collar – 8 inch (20.32 cm) x 1/4 inch ( 1.9 cm)
Bow – 2 inch (5.1 cm) x 1/4 inch (1.9 cm)
Nose – 6 mm circle
- Sew or glue the short edges of the smaller felt piece together. Flatten it and wrap red thread around it to make a bow. You can stitch a small jingle bell to the bottom of the bow.
- Stitch this bow flat against the center of the larger felt piece to create a collar.
- Attach each antler between rows 1 and 2 on either side.
- Stitch the ears into place between rows 3 and 4 on either side.
- Stitch the arms on at row 8. They should be positioned slightly behind the ears in the back of the reindeer.
- The collar should cover row 8 and the seams of the arms.
- Attach the safety eyes between rows 5 and 6. Place the safety eyes 2 stitches over from the ears with 4 stitches between each eye.
- Stitch the nose in the center of both eyes.
- I used this technique to create the mouth with black thread.
- Pass pink embroidery thread through the stitch underneath each eye twice to create blush.
Your reindeer is complete!
This pattern is for personal use only. You may use the pattern to make unlimited items for yourself, for charity, or to give as gifts. You may sell items you personally make by hand from this pattern. Do not distribute this pattern including but not limited to scanning, photocopying, emailing, or posting on a website or internet discussion group.
